Mar 23 • Jordan Felber

How to import custom CAD hatches in AutoCAD?

Related Course - AutoCAD for Landscape Design

In landscape design, CAD hatches are essential styling tools used to convey the visual intent of a 2D plan to clients, contractors, and consultants.

CAD hatches represent a variety of materials and textures that help translate design concepts into easily understood visuals. For example, they range from the color variations of stone paving to the intricate patterns that may define a planting zone.

By incorporating CAD hatches, designers ensure that their drawings align with the project’s intended aesthetic, especially when illustrating functional elements that impact both form and usability.

Although AutoCAD includes a library of standard hatch patterns, designers often require custom hatches to depict specific materials or textures not available in default settings.

Custom CAD hatches enhance the clarity and professionalism of design drawings. They not only save time by eliminating the need for manual detailing but they also strengthen communication across the design, ensuring precise interpretation of the overall project.

In this article, we'll guide you through exactly how to locate, download and import custom CAD hatches (.PAT files) in AutoCAD.

TABLE OF CONTENTS:
  • Overview of CAD Hatch Patterns in AutoCAD
  • Step 1: Download CAD Hatch Patterns
  • Step 2: Unzip the Folder and Store on a Local Drive
  • Step 3: Type command “OPTIONS” in AutoCAD
  • Step 4: Select “Support File Search Path”
  • Step 5: Use "HATCH" Command

Overview of CAD Hatch Patterns in AutoCAD

What is a CAD Hatch? In the context of AutoCAD, a "hatch" refers to a fill pattern that serves multiple purposes in a design project. These hatch patterns are used to visually represent different materials, help differentiate between various objects, or to incorporate textures into a design.

AutoCAD is equipped with a selection of standard hatch patterns that can be easily accessed and applied to your designs. However, the software also allows users to create custom hatches. This feature is particularly useful for representing unique materials that may not be covered by standard patterns, or for adhering to specific design standards and requirements that are essential in certain projects.

What type of file is needed to use custom hatches in AutoCAD? CAD hatches are stored as files with the extension .PAT. AutoCAD is designed to read these hatch patterns from their .PAT files that are located within its "support file search path". This means that, as a user, you can easily add new hatch patterns to your projects by ensuring that your custom .PAT files are placed in the correct directories where AutoCAD can access them.

Step 1: Download a Custom CAD Hatch

CADdetails website with cad hatches to download
When it comes to downloading custom CAD hatches, there are countless pre-built CAD hatches available online for download.

These custom resources are effective for both professionals and enthusiasts looking to expand their collection of hatch patterns for varied design work inside the software.

Oftentimes, you can look directly to a manufacturer to find custom CAD hatches, as well. It's common for manufacturers to create custom CAD hatches of their own individual products.

Below is a list of various places where you can download .PAT files specifically made for CAD hatch patterns.

Step 2: Unzip the Folder and Store on Local Drive

When you choose a custom digital file to download with custom .PAT files made for AutoCAD hatches, you will usually see that the file is in a compressed format called .zip.

This means that the files inside the .zip file are bundled together in a way that reduces their overall size, making it easier and faster to download.

Once you have successfully downloaded the .ZIP file to your computer, you will need to extract what's inside in order to access the individual .PAT files for use in your AutoCAD projects.

Step 2.1

You must unzip the folder before uploading the .PAT files into AutoCAD — if you don’t, AutoCAD won’t be able to read or access the pattern definitions inside the compressed file.

Step 2.2

For best results, save the unzipped .PAT files to a local drive where AutoCAD can reliably access the CAD hatches. 
  • Storing the files in the cloud may cause connection issues or slow loading times, especially if the .PAT file isn’t synced locally. 

Step 2.3

Click inside the folder containing the AutoCAD Hatches to ensure the .PAT Files are contained inside. 
  • Below is a screenshot of the files located in a computer folder from www.CADdetails.com - “Unilock Metric Hatch Patterns”
screenshot of cad hatches in .PAT format contained inside a folder downloaded from the CADdetails.com

Step 3: Type command “OPTIONS” in AutoCAD

Once the .PAT file is unzipped and saved on a local drive, open AutoCAD and navigate to Model Space. 

Step 3.1

To link the custom hatch file, type "OPTIONS" into the command line and press Enter. This opens the Options dialog box, where you can manage file paths.
screenshot of the command bar in autocad showing to use the command "options" to import custom cad hatches

Step 4: Select “Support File Search Path”

After inputting the command “OPTIONS” in AutoCAD, a dialog box will appear within AutoCAD. This is the area of AutoCAD where you can upload your .PAT

For PC Users

Step 4.1

Click “Files” tab located on the top toolbar
screenshot of the options command in autocad with the "files" tab selected with "Support File Search Path" expanded

Step 4.2

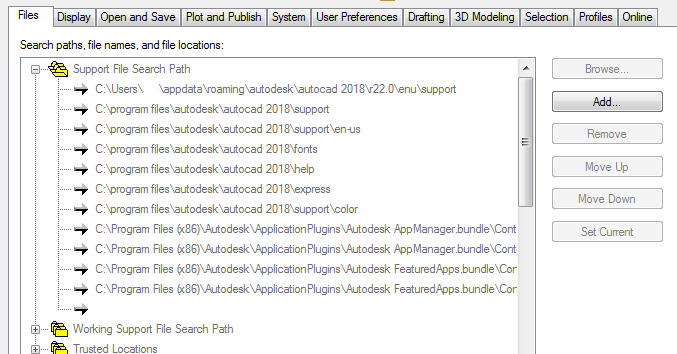
Expand “Support File Search Path” by clicking the “+” icon

Step 4.3

While inside the dropdown menu, click “Add” and “Browse” to Locate the unzipped folder containing the .PAT files from your computer.
  • AutoCAD needs to reference the folder only, not individual .PAT files.

Step 4.4

To complete adding custom CAD hatches into AutoCAD, click “Apply” then “Ok”. 

For Apple Users

Step 4.5

Click “Application” tab located on the left toolbar
screenshot of the options command in autocad with the "files" tab selected with "Support File Search Path" expanded

Step 4.6

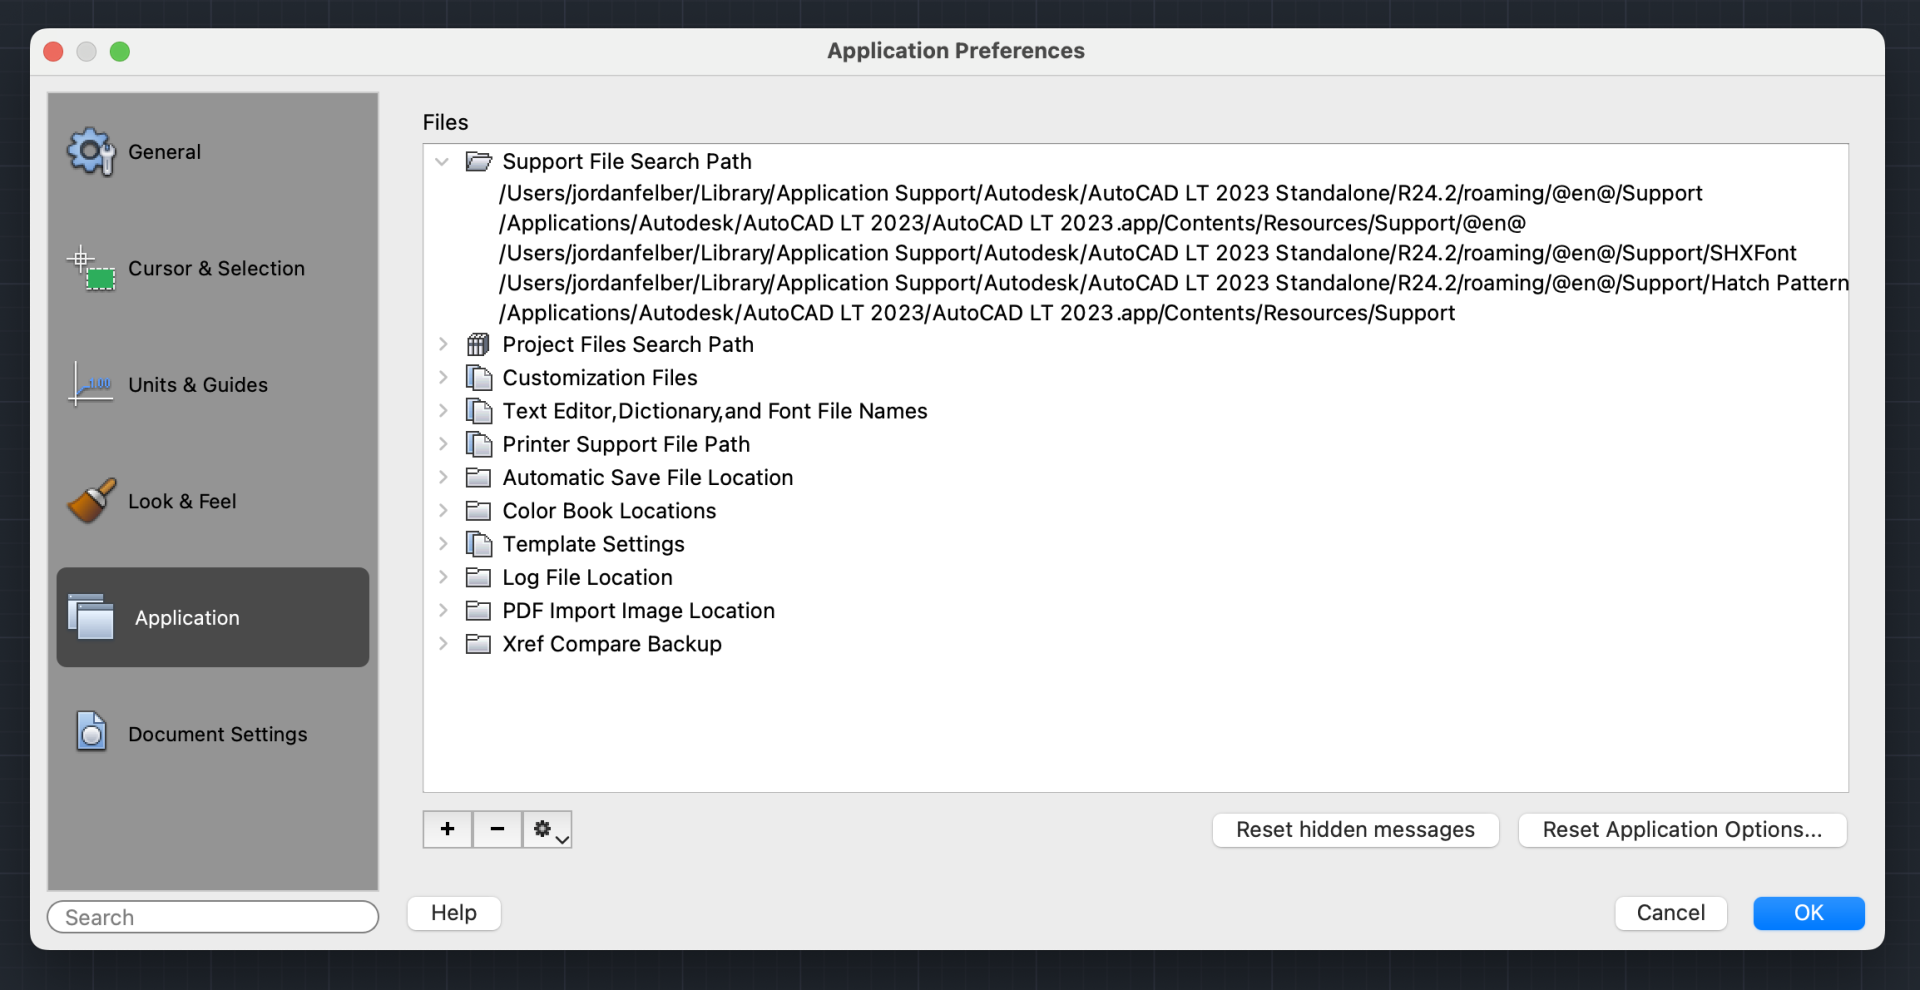
Expand “Support File Search Path” by clicking the “Down Arrow” icon.

Step 4.7

While inside the dropdown menu, click the “+” icon located in the bottom toolbar, and locate the unzipped folder containing the .PAT files from your computer.
  • AutoCAD needs to reference the folder only, not individual .PAT files.

Step 4.8

To complete adding custom CAD hatches in AutoCAD, click “Ok”. 

Step 5: Use “HATCH” Command

Now that you've told AutoCAD to automatically look for these specific .PAT files, you can now use your downloaded custom CAD hatches within closed shapes in AutoCAD.

To initiate the HATCH command in AutoCAD, you need to start by locating the command in the Ribbon Bar or simply type the word "HATCH" into Model Space exactly as it appears, ensuring that you spell it correctly.

After entering the command, you should then press the Enter key on your keyboard. This action will activate the HATCH command, enabling you to proceed with your desired operations in the drawing.

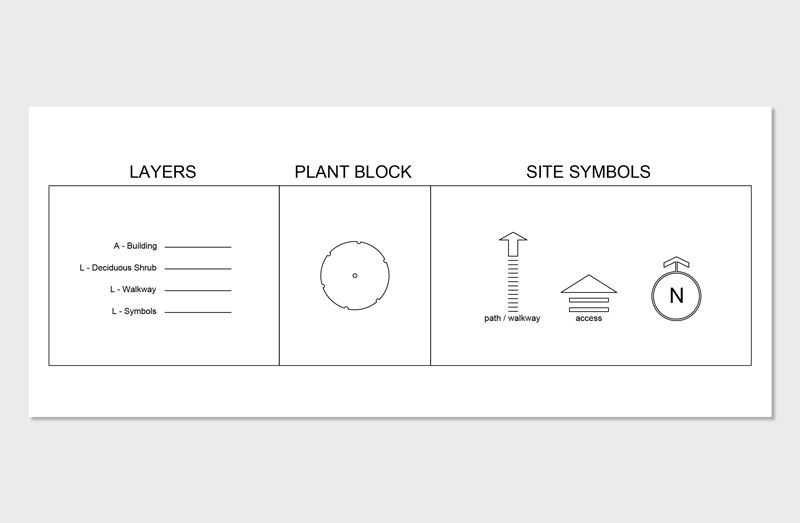
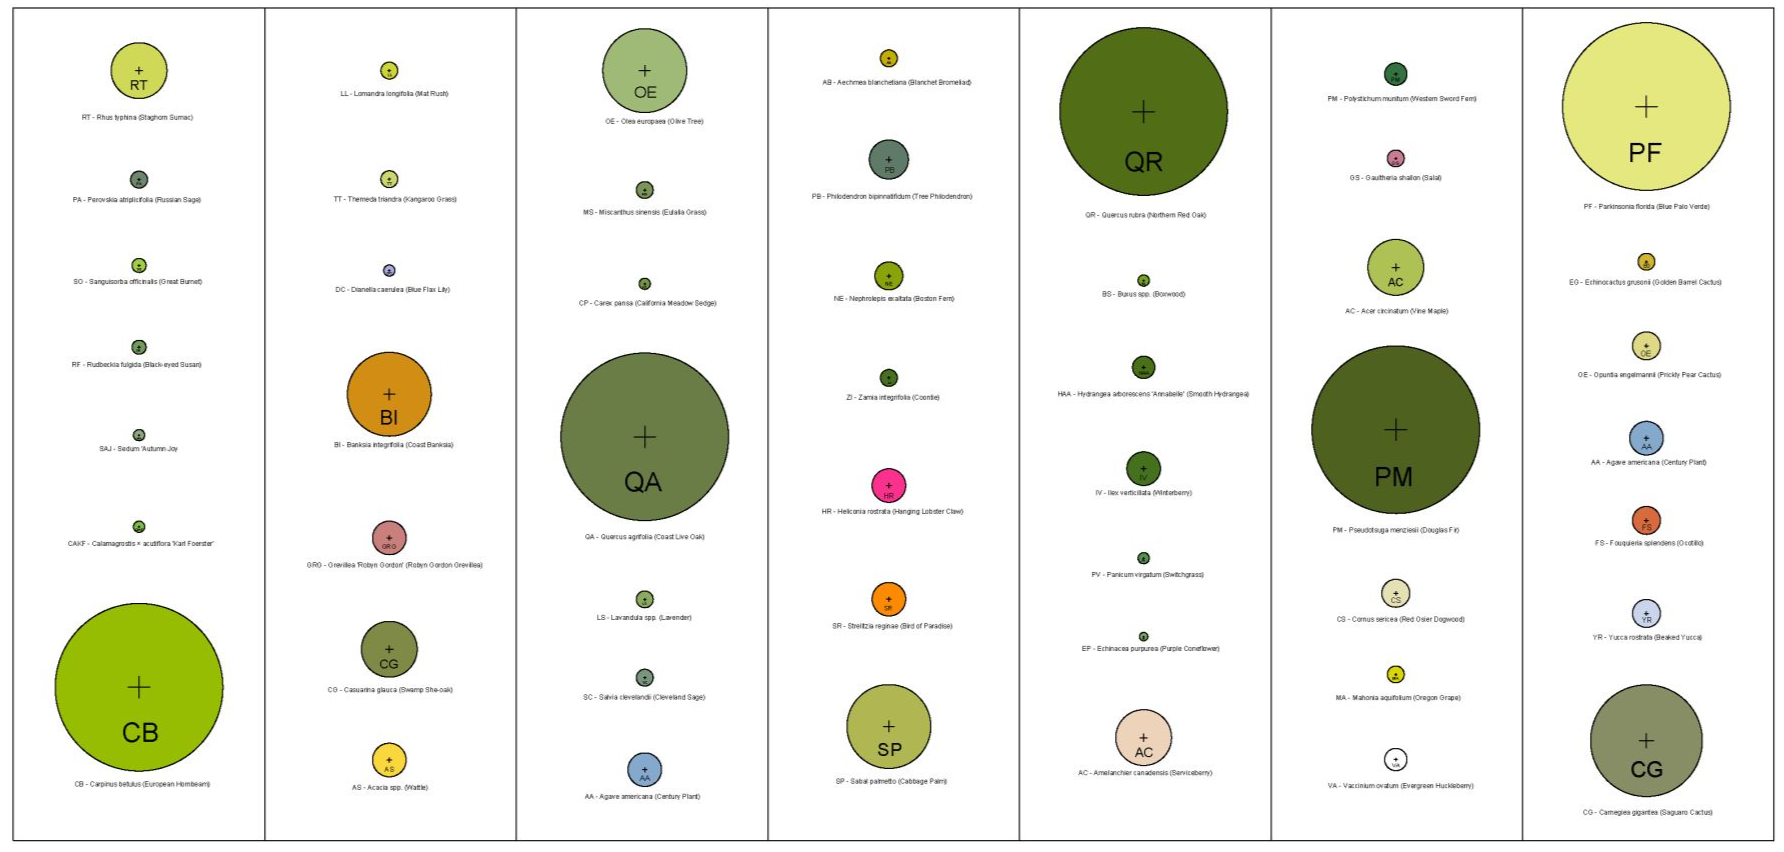
For landscape designers, hatching is a powerful tool to visually represent different materials and textures—such as grass, stone, pavers, or mulch—directly in the plan.

This not only adds clarity and professionalism to your drawings but also helps communicate design intent, material choices, and spatial organization to clients, contractors, and collaborators.